Guide to Monitor Arms – Things You Need To Know
Consider this article as a buying guide for monitor arms. Monitor arms are a little bit different to monitor mounts.
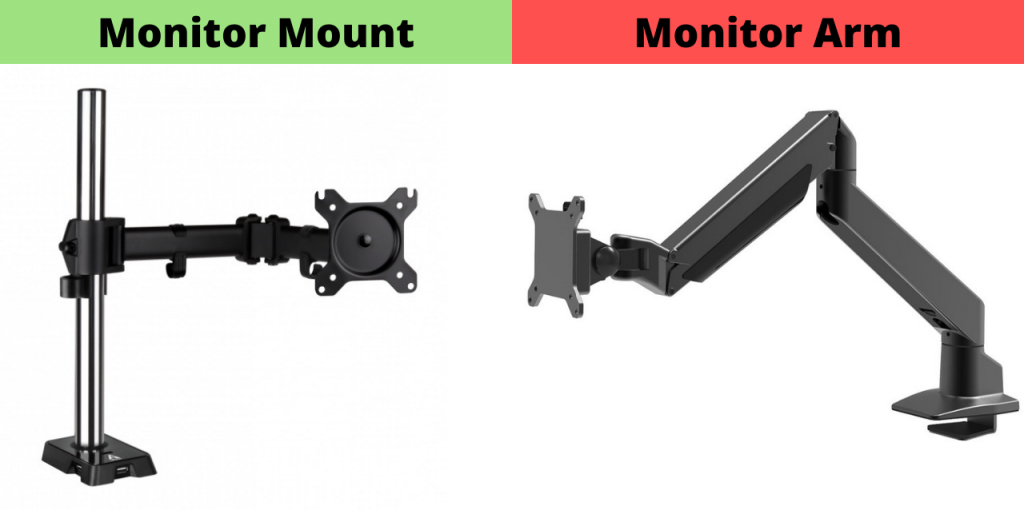
A monitor mounts is where stationary pole has an arm that comes out and holds the monitor. On the other hand, a monitor arm has two arm system where one arms can be adjusted (up, down, right, left, swivel, tilt). You can easily makes these adjustments in every direction.
This article is all about monitor arms. We will look into the different components and I’ll share some tips about what you’re looking for. There are so many options out there and I hope I will be able to help you out in this detailed guide.
I will compare a bunch of different types of monitor arms that are available in the market. So, I can give an idea of all these to you.
Reason To Get a Monitor Arm?
The very first reason anyone would get a monitor arm is of course it makes your setup look good and gives you more space on your desk. Because the arm is mounted on the rear edge of the table, and you don’t have a large monitor stand. So you get all the extra space underneath the monitor.
Also Read: Triple Monitor Stands
These monitor arms also have great cable management which makes your setup look nicer and clutter free.
The second reason why people usually get a monitor arm is for the workplace. Especially where you need to show your monitor to another person time to time. A monitor arm makes it easy to swing your monitor around in any direction.
Basically it has a lot more movement without having to pickup or drag your monitor.
Read: Monitor Buying Guide
Different Configurations
Monitor arms usually come in two configurations. The first configuration is your single arm for one monitor and the second configuration is where you get the dual arm system from single mounting point for two monitors.
If you have two large monitors that won’t fit into a dual arm system then you can get two single monitor arms and mount them on each corner of the desk. In my experience, most of the dual arm systems can only support a 34” monitor.
So, if you have two ultrawide monitors in your setup then two single monitor arms will be the answer. However, two 34” or smaller sized monitors can be easily mounted on a dual monitor arm system.
Also Read: Monitor Arms for Ultrawide Monitors
Components of a Monitor Arm
Now lets look at the different components of a monitor arm. We’re going to work our way from the very bottom and work our way towards the top.
Base Mount
At the very base we have the clamp part. Some people don’t realize but this is actually very important part because it takes all the weight of the monitor and and accessories.
Usually there are two different methods to clamp the base mount to the table. One is a c-clamp. I have seen two types of c-clamps.
The first one has a sort of plate backing system. It has a little screw and a hex by which you can slowly screw it up by hand and adjust it. For me it’s a bit difficult because you have to move the table or get behind/under the computer desk to tighten the screw.
There is another mechanism where you use an alkaline to tighten the clamp. Here you can easily tighten the c-clamp from the top without moving the desk or going underneath it. Personally, I prefer this method because it is easier for me to mount a clamp like this.
This this type of monitor arms don’t have a metal plate and the c-clamp has a rubber protection that protects the computer desk from getting scratches.
There is a second method where you have to drill a hole in the gaming desk for a large screw to pass through.
It is a long screw that goes from the top and screws in the metal plate from the bottom.
This type of clamp are extremely sturdy but you won’t be moving this thing around much. Whereas the other one is easy to move around. It is also destructive because you are making a hole in your gaming desk. So, mostly I prefer c-clamp that is tighten using alkaline.
Here is a tip for you when comparing different base mount of different brands. Make sure the bottom part and the top part are both has a wide surface area. The bigger the surface area of these parts the better the grip will be.
If these parts are too small or narrow then there is a possibility that your monitor arm won’t hold well. Especially with the dual monitor arms, they can be flimsy.
Bottom Arm
There is nothing much to know about the bottom arm. It is what it is. Lots of newer version of monitor arms now come with hidden cable management. They have a little lid that you can take and hide your monitor cables.
There is enough space for the cables to pass through. However, if you have a monitor arm with no cable management then you can simply use some zip ties.
Some of the arms are fitted using screws but some simply uses the gravity. You can just grab it and pull up to remove the arm. It is as simple as that. Easy to place and easy to remove without the need of adding the screws.
Top Arm
The third component is the top arm, which is also the most important part because most of the issues that occur are in this component. You need to make sure that this part is reliable before making a purchase. So, I will be discussing this part in detail.
First, see if it has cable management. I am using WALI Single Monitor arm, which has very good cable management. There is a cover for cable management that you can easy pop off and that put back after placing in the cables.
The second part of the top arm is the hydraulic system that allows you to move your monitor up or down. The hydraulic is a key part that you need to pay attention to. Usually you will find that there is a weight class for each monitor arm. Classifying from a minimum supported weight to a maximum support weight for the monitor arm.
For example, the one I’m using has a minimum support weight of 2 kilograms and has a maximum support weight of 15 kilograms. Each monitor arm can have a different weight class. There are monitor arms that can do one kilogram to five kilograms.
To work out what weight class or which monitor arm you need to get, you need to check out on how much your monitor weighs or the accessory you will be using on the end of this monitor arm. Now find a monitor arm with a weight class where your monitor falls under.
Also Read: Monitors under $300
It is important to stay within those two ranges and don’t go over or under. What would happen when you go under the minimum weight is that the high pressure of hydraulic won’t let the arm go down. Even if you bend the arm, it will go right back up with speed and if the monitor or accessory is not screwed, it might fall.
Read: Cool Gaming Desk Accessories
You can move the arm around but you cannot bring it down towards the table top. This is why there’s a minimum weight class. So, if you apply the right weight, the arm will stay where you set it.
Tilt Function
Tilt function can also be affected if weight is above the mentioned limits. This happens when users get a big heavy monitor and this tilt function is not able to support that weight. You’ll see that the monitor will start tilting downwards like it is sad
No matter how much you tighten the screws, it won’t stay in place and tilt down. So, make sure that your monitor matches the weight within the rate range of the monitor arm.
Adjustability
These monitor arms are very adjustable. You can adjust the sensitivity of hydraulics by using the alkaline. You can actually try and see how much you want to adjust this. For a lightweight monitor you would want low sensitivity and for a higher weight monitor high sensitivity will be better.
For example, a lightweight item like a laptop that you need to bring down to use. You’ll adjust your hydraulics where it isn’t as strong, so you can actually be able to keep that monitor arm at specific level right when you have automatically raise itself up.
Adjustment for the hydraulic is done from the bottom part using alkaline. You also have adjustments for swivel and tilt, which can be done using alkaline near the neck part.
Some monitor arms use knobs to tighten these parts but I don’t like them because you can’t really tighten those very well. This is why I prefer the alkaline versions.
Also make sure that you don’t over tighten these because sometimes it may break. Over time all these parts might need you to adjust them a little bit as it does get a little bit loose every time you move around your monitor. Especially the tilt function needs frequent adjustments.
Also Read: How to Choose a Gaming Desk – Guide
Head
Head of the monitor arm is the one that connects a monitor to a monitor arm.
In the medium to upper range of the monitor arms, they have a quick release plate. The VESA plate that screws to the monitor is detachable for the convenience. You can easily detach it by simply pushing the button/lever and sliding up the plate.
These plates are VESA compatible. You should check your monitors back because your monitor needs to have these screw holes. These holes have a certain distance You can read a detailed guide about VESA standard sized.